Code Review and Testing
I am a tech ethusiast with passion for technology, embracing the world of continuous integration, automation, and collaboration to make a meaningful impact in the dynamic realm of DevOps.
What is a Code Review and Why Should You Do This?
A code review is when developers look over the codebase, a subset of code, or specific code changes and provide feedback. These developers are often called reviewers. It is better to have more than one reviewer when possible.
It is best to have reviewers who understand the purpose of the code so that they can give quality and relevant feedback. The reviewers will provide comments, typically to the author of the code, on what they think needs to be fixed. Because a lot of comments can be subjective, it is up to the author to decide if the comment needs to be addressed, but it is good to have agreement from the reviewer(s) if it will not be fixed. This code review process only happens after the code changes are complete and tested.
The goal of code reviews is to make sure that the final code:
is easy to read
is easy to understand
follows coding best practices
uses correct formatting
is free of bugs
has proper comments and documentation
is clean
Doing code reviews has benefits for the whole team. For the author, they get input from the reviewers and learn additional best practices, other ways the code could have been implemented, and different coding styles. As a result of the review, the author learns from their mistakes and can write better code the next time. Code reviews aren’t just for junior developers, they are a great learning process for all developers.
Code reviews also transfer knowledge about the code between developers. If the reviewers have to work on that piece of code in the future, they will have a better understanding of how it works.
Code reviews are a way to refine working code or spot potential bugs, which increases the quality of the code. In general, having another set of eyes on the code is never a bad thing.
Types of Code Reviews
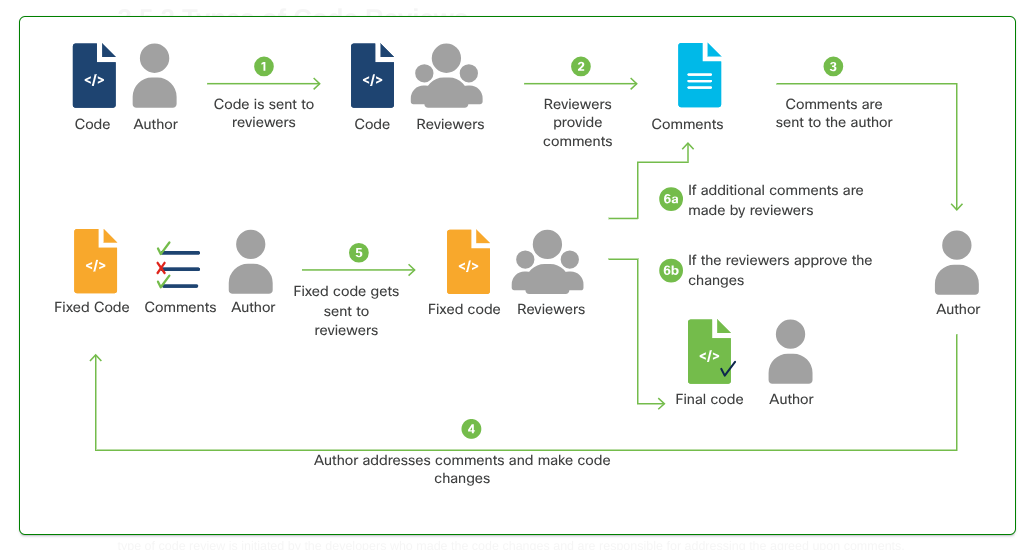
There are many ways to do code reviews. Each one has its own benefits. The most common types of code review processes include:
Formal code review
Change-based code review
Over-the-shoulder code review
Email pass-around
Formal Code Review
A formal code review is where developers have a series of meetings to review the whole codebase. In this meeting, they go over the code line by line, discussing each one in detail. This type of code review process promotes discussion between all of the reviewers.
A formal code review enables reviewers to reach a consensus, which may result in better feedback. You might do a new code review every time the comments are addressed.
Details of the code review meetings, such as the attendees, the comments, and comments that will be addressed, are documented. This type of code review is often called Fagan inspection and is common for projects that use the waterfall software development methodology.
A modern adaptation of the formal code review is to have a single meeting to review only the code changes. This way, the code can benefit from the live discussion amongst reviewers. This is sometimes known as a walkthrough.
Change-Based Code Review
A change-based code review, also known as a tool-assisted code review, reviews code that was changed as a result of a bug, user story, feature, commit, etc.
In order to determine the code changes that need to be reviewed, a peer code review tool that highlights the code changes is typically used. This type of code review is initiated by the developers who made the code changes and are responsible for addressing the agreed upon comments. In this type of code review process, the reviewers usually perform the review independently and provide the comments via the peer code review tool.
A change-based code review makes it easy to determine the actual code changes to be reviewed and enables multiple reviewers to get a diverse look into the code.
Over-the-Shoulder Code Review
An over-the-shoulder code review is exactly what it sounds like. A reviewer looks over the shoulder of the developer who wrote the code. The developer who wrote the code goes through the code changes line by line and the reviewer provides feedback.
With this method, if the fix is not difficult, the code may be changed on the spot so that the reviewer can re-review it immediately. The benefit of an over-the-shoulder code review is that there is direct interaction between the author of the code and the reviewer, which allows for discussion about what is the right fix. The downside of this type of code review is that it typically involves only one reviewer, so the comments can be one-sided.
Email Pass-Around
An email pass-around review can occur following the automatic emails sent by source code management systems when a checkin is made. When the emails are sent, it is up to the other developers to review the code changes that were made in that checkin. The downside of this type of code review is that sometimes a single checkin can be just a piece of the whole code change, so it may not include the proper context to fully understand the code changes.
Testing
Why do coders test software? The simple answer is to make sure it works the way it is supposed to work. This answer conceals a wealth of nuance and detail.
To begin with, software testing is classically subdivided into two general categories:
Functional testing seeks to determine whether software works correctly. Does it behave as intended in a logical sense, from the lowest levels of detail examined with Unit Testing, to higher levels of complexity explored in Integration Testing?
Non-functional testing examines usability, performance, security, resiliency, compliance, localization, and many other issues. This type of testing finds out if software is fit for its purpose, provides the intended value, and minimizes risk.
You might think that functional testing happens early in the development cycle, and non-functional testing begins after parts of the software are built or even finalized. This is incorrect. Some types of non-functional testing (for example, determining whether a particular language, open source library, or component meets requirements of a design, or a standard) need to happen well before design is fixed.
"Agile" software development favors highly-adaptable, minimally-planned creation and extension of a Minimum Viable Product (MVP) over short sprints. This means the product exists, in some form, from very early on in the process. And that means it can be subject both to functional and non-functional tests from the start.
In fact, as you’ll see towards the end of this unit, some developers advocate using testing as a framework for guiding software development. This means capturing design requirements as tests, then writing software to pass those tests. This is called Test-Driven Development (TDD).
Let’s look at some methods and tools for testing the lines of code, blocks, functions, and classes.
Unit Testing
Detailed functional testing of small pieces of code (lines, blocks, functions, classes, and other components in isolation) is usually called Unit Testing. Modern developers usually automate this kind of testing using unit test frameworks. These test frameworks are software that lets you make assertions about testable conditions and determine if these assertions are valid at a point in execution. For example:
a = 2 + 2assert a == 4
The assert keyword is actually native to Python. In this case, the assertion will return true because 2 + 2 does, in fact, equal 4. On the other hand, if you were to have:
assert a == 5
It would return false and trigger an error.
Collecting assertions and reporting on tests is made easier with testing frameworks. Some examples of test frameworks for Python include:
unittest — This is a framework included in Python by default. It lets you create test collections as methods extending a default TestCase class.
PyTest — This is a framework that is easily added to Python (from pip repositories:
pip3 install pytest). PyTest can run unittest tests without modification, but it also simplifies testing by letting coders build tests as simple functions rather than class methods. PyTest is used by certain more-specialized test suites, like PyATS from Cisco.
Both are used in this part, so you can see some of the differences between them.
Simple Unit Testing with PyTest
PyTest is handy because it automatically executes any scripts that start with test_ or end with _test.py, and within those scripts, automatically executes any functions beginning with test_ or tests_. So we can unit test a piece of code (such as a function) by copying it into a file, importing pytest, adding appropriately-named testing functions (names that begin with tests_ ), saving the file under a filename that also begins with tests_, and running it with PyTest.
Suppose we want to test the function add5() , which adds 5 to a passed value, and returns the result:
def add5(v):
    myval = v + 5
    return myval
We can save the function in a file called tests_mytest.py. Then import pytest and write a function to contain our tests, called tests_add5() :
# in file tests_mytest.py
import pytest
def add5(v):
    myval = v + 5
    return myval
def tests_add5():
    r = add5(1)
    assert r == 6
    r = add5(5)
    assert r == 10
    r = add5(10.102645)
    assert r == 15.102645
The tests in our testing function use the standard Python assert keyword. PyTest will compile and report on those results, both when collecting test elements from the file (a preliminary step where PyTest examines Python's own code analysis and reports on proper type use and other issues that emerge prior to runtime), and while running the tests_add5() function.
You can then run the tests using:
pytest tests_mytest.py
And get a result that looks something like this:
============================= test session starts ==============================
platform darwin -- Python 3.8.1, pytest-5.3.5, py-1.8.1, pluggy-0.13.1
rootdir: /home/tana/python/mytest
collected 1 item
tests_mytest.py .                                                        [100%]
============================== 1 passed in 0.01s ===============================
Note that while the function under test is certainly trivial, many real-world programs contain functions that, like this one, perform math on their arguments. Typically, these functions are called by higher-level functions, which then do additional processing on the returned values.
If there is a mistake in a lower-level function, causing it to return a bad result, this will likely be reflected in higher-level output. But because of all the intermediary processing, it might be difficult or impossible to find the source of an error (or even note whether an error occurred) by looking at output of these higher-level functions, or at program output in general.
That is one reason why detailed unit testing is essential for developing reliable software. And it is a reason why unit tests should be added, each time you add something significant to code at any level, and then re-run with every change you make. We recommend that, when concluding a work session, you write a deliberately-broken unit test as a placeholder, then use a start-of-session unit test run to remind you where you left off.
Simple Unit Testing with unittest
The unittest framework demands a different syntax than PyTest. For unittest , you need to subclass the built-in TestCase class and test by overriding its built-in methods or adding new methods whose names begin with test_. The example unit test script, above, could be modified to work with unittest like this:
import unittest
def add5(v):
    myval = v + 5
    return myval
class tests_add5(unittest.TestCase):
    def test_add5(self):
        self.assertEqual(add5(1),6)
        self.assertEqual(add5(5),10)
        self.assertEqual(add5(10.102645),15.102645)
if __name__ == '__main__':
    unittest.main()
As with PyTest, you import the unittest module to start. Your function follows.
To subclass the TestCase class, pass it to your own (derived) test class (again called tests_add5, though this is now a class, rather than a function), causing the latter to inherit all characteristics of the former. For more on Python object-oriented programming (OOP), see the documentation.
Next, use unittest's assertEqual method (this is one of a wide range of built-in test methods) in the same way that you used Python's native assert in the PyTest example. Basically, you are running your function with different arguments, and checking to see if returned values match expectations.
The last stanza is a standard way of enabling command-line execution of our program, by calling its main function; which, in this case, is defined by unittest.
Save this file (again as tests_mytest.py ), ensure that it is executable (for example, in Linux, using chmod +x tests_mytest.py ) and execute it, adding the -v argument to provide a verbose report:
python3 tests_mytest.py -v
test_add5 (__main__.tests_add5) ... ok
----------------------------------------------------------------------
Ran 1 test in 0.000s
OK
Integration Testing
After unit testing comes integration testing, which makes sure that all of those individual units you have been building fit together properly to make a complete application. For example, suppose an application that you are writing needs to consult a local web service to obtain configuration data, including the name of a relevant database host. You might want to test the values of variables set when these functions are called. If you were using PyTest, you could do that like this:
import requests   # python module that simplifies making web requests
def get_config():
    return requests.get("http://localhost/get_config").content
def set_config(dbhost):
    requests.get("http://localhost/config_action?dbhost="+dbhost)
save_dbhost = ""
def setUp():
    global save_dbhost
    save_dbhost = get_config()
def tearDown():
    global save_dbhost
    set_config(save_dbhost)
def test_setconfig():
    setUp()
    set_config("TESTVAL")
    assert get_config() == "ESTVAL"
    tearDown()
Note that your test_setconfig() method deliberately calls your setUp() function before running tests, and your tearDown() function afterward. In unittest, methods called setUp() and tearDown() are provided by the TestCase class, can be overridden in your defined subclass, and are executed automatically.
Running this code with PyTest might produce output like this:
============================== test session starts ===============================
platform linux2 -- Python 2.7.15+, pytest-3.3.2, py-1.5.2, pluggy-0.6.0
rootdir: /home/ubuntu/deploysample, inifile:
collected 1 item
test_sample_app.py F                                                       [100%]
==================================== FAILURES ====================================
_________________________________ test_setconfig _________________________________
    def test_setconfig():
        setUp()
        set_config("TESTVAL")
>       assert get_config() == "ESTVAL"
E       AssertionError: assert 'TESTVAL' == 'ESTVAL'
E         - TESTVAL
E         ? -
E         + ESTVAL
test_sample_app.py:21: AssertionError
------------------------------- Captured log call --------------------------------
connectionpool.py          225 DEBUG    Starting new HTTP connection (1): localhost:80
connectionpool.py          437 DEBUG    http://localhost:80 "GET /get_config HTTP/1.1" 200 7
connectionpool.py          225 DEBUG    Starting new HTTP connection (1): localhost:80
connectionpool.py          437 DEBUG    http://localhost:80 "GET /config_action?dbhost=TESTVAL HTTP/1.1" 200 30
connectionpool.py          225 DEBUG    Starting new HTTP connection (1): localhost:80
connectionpool.py          437 DEBUG    http://localhost:80 "GET /get_config HTTP/1.1" 200 7
============================ 1 failed in 0.09 seconds ============================
If you fix the broken test, you can see that everything runs perfectly:
============================== test session starts ===============================
platform linux2 -- Python 2.7.15+, pytest-3.3.2, py-1.5.2, pluggy-0.6.0
rootdir: /home/ubuntu/deploysample, inifile:
collected 1 item
test_sample_app.py .                                                       [100%]
============================ 1 passed in 0.07 seconds ============================
Again, you should run your integration tests before you make any changes for the day, whenever you make significant changes, and before you close out for the day. If you are using Continuous Integration, any errors you find must be corrected before you do anything else.
Note: You can run this script on your VM using pytest. However, understanding the output and fixing any errors is beyond the scope of this course.
Test-Driven Development (TDD)
Building small, simple unit and integration tests around small bits of code helps in two ways:
It ensures that units are fit for purpose. In other words, you make sure that units are doing what requirements dictate, within the context of your evolving solution.
It catches bugs locally and fixes them early, saving trouble later on when testing or using higher-order parts of your solution that depend on these components.
The first of these activities is as important as the second, because it lets testing validate system design or, failing that, guide local refactoring, broader redesign, or renegotiation of requirements.
Testing to validate design intention in light of requirements implies that you should write testing code before you write application code . Having expressed requirements in your testing code, you can then write application code until it passes the tests you have created in the testing code.
This is the principle of Test-Driven Development (sometimes called Test-First Development). The basic pattern of TDD is a five-step, repeating process:
Create a new test (adding it to existing tests, if they already exist). The idea here is to capture some requirement of the unit of application code you want to produce.
Run tests to see if any fail for unexpected reasons. If this happens, correct the tests. Note that expected failures, here, are acceptable (for example, if your new test fails because the function it is designed to test does not yet exist, that is an acceptable failure at this point).
Write application code to pass the new test. The rule here is to add nothing more to the application besides what is required to pass the test.
Run tests to see if any fail. If they do, correct the application code and try again.
Refactor and improve application code. Each time you do, re-run the tests and correct application code if you encounter any failures.
By proceeding this way, the test harness leads and grows in lockstep with your application. This may be on a line-by-line basis, providing very high test coverage and high assurance that both the test harness and the application are correct at any given stopping-point. Co-evolving test and application code this way:
Obliges developers to consistently think about requirements (and how to capture them in tests).
Helps clarify and constrain what code needs to do (because it just has to pass tests), speeding development and encouraging simplicity and good use of design patterns.
Mandates creation of highly-testable code. This is code that, for example, breaks operations down into pure functions that can be tested in isolation, in any order, etc.