Version Control Systems
I am a tech ethusiast with passion for technology, embracing the world of continuous integration, automation, and collaboration to make a meaningful impact in the dynamic realm of DevOps.
Types of Version Control Systems
Version control, also called version control systems, revision control or source control, is a way to manage changes to a set of files in order to keep a history of those changes. Think of all the times you have made a copy of a file before modifying it, just in case you want to revert to the original. Version control handles all of that for you.
Version control systems store the master set of files and the history of changes in a repository, also known as a repo. In order to make a change to a file, an individual must get a working copy of the repository onto their local system. The working copy is the individual's personal copy of the files, where they can make changes without affecting others. Some of the benefits of version control are:
It enables collaboration - Multiple people can work on a project (a set of files) at the same time without overriding each other's changes.
Accountability and visibility - Know who made what changes, when they made those changes and why.
Work in isolation - Build new features independently without affecting the existing software.
Safety - Files can be reverted when a mistake is made.
Work anywhere - Files are stored in a repository, so any device can have a working copy.
Types of Version Control Systems
There are three types of version control systems:
Local
Centralized
Distributed
Local Version Control System
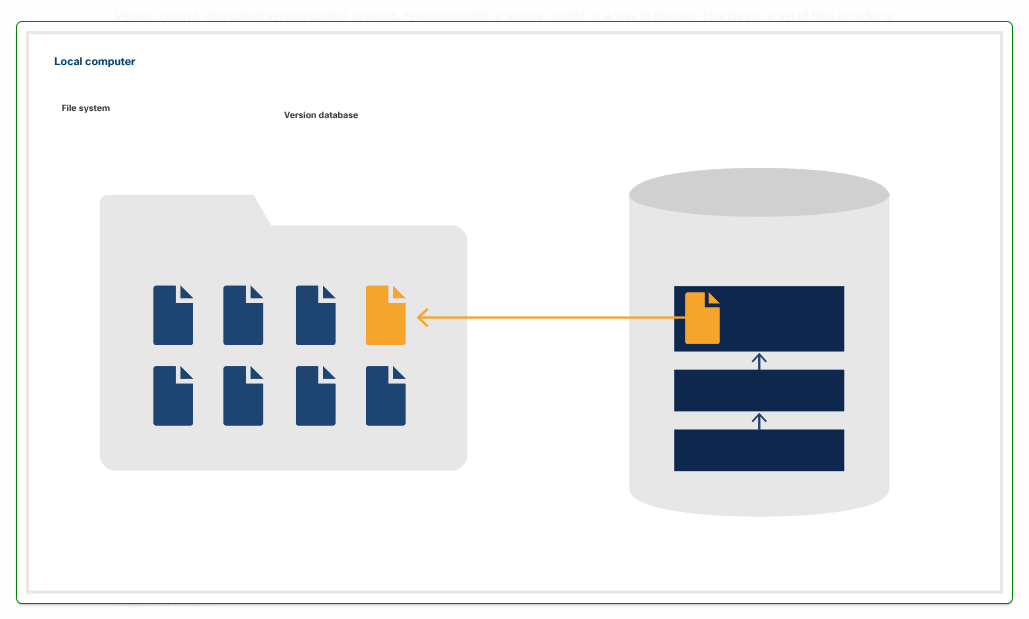
Just like the name states, a Local Version Control System (LVCS) tracks files within a local system. A local version control system replaces the "make a copy of the file before editing further" scenario. The focus of a local version control system is mostly to be able to revert back to a previous version. This type of version control isn't meant to address most of the benefits listed above.
Local version control systems use a simple database to keep track of all of the changes to the file. In most cases, the system stores the delta between the two versions of the file, as opposed to the file itself. When the user wants to revert the file, the delta is reversed to get to the requested version.
Centralized Version Control System
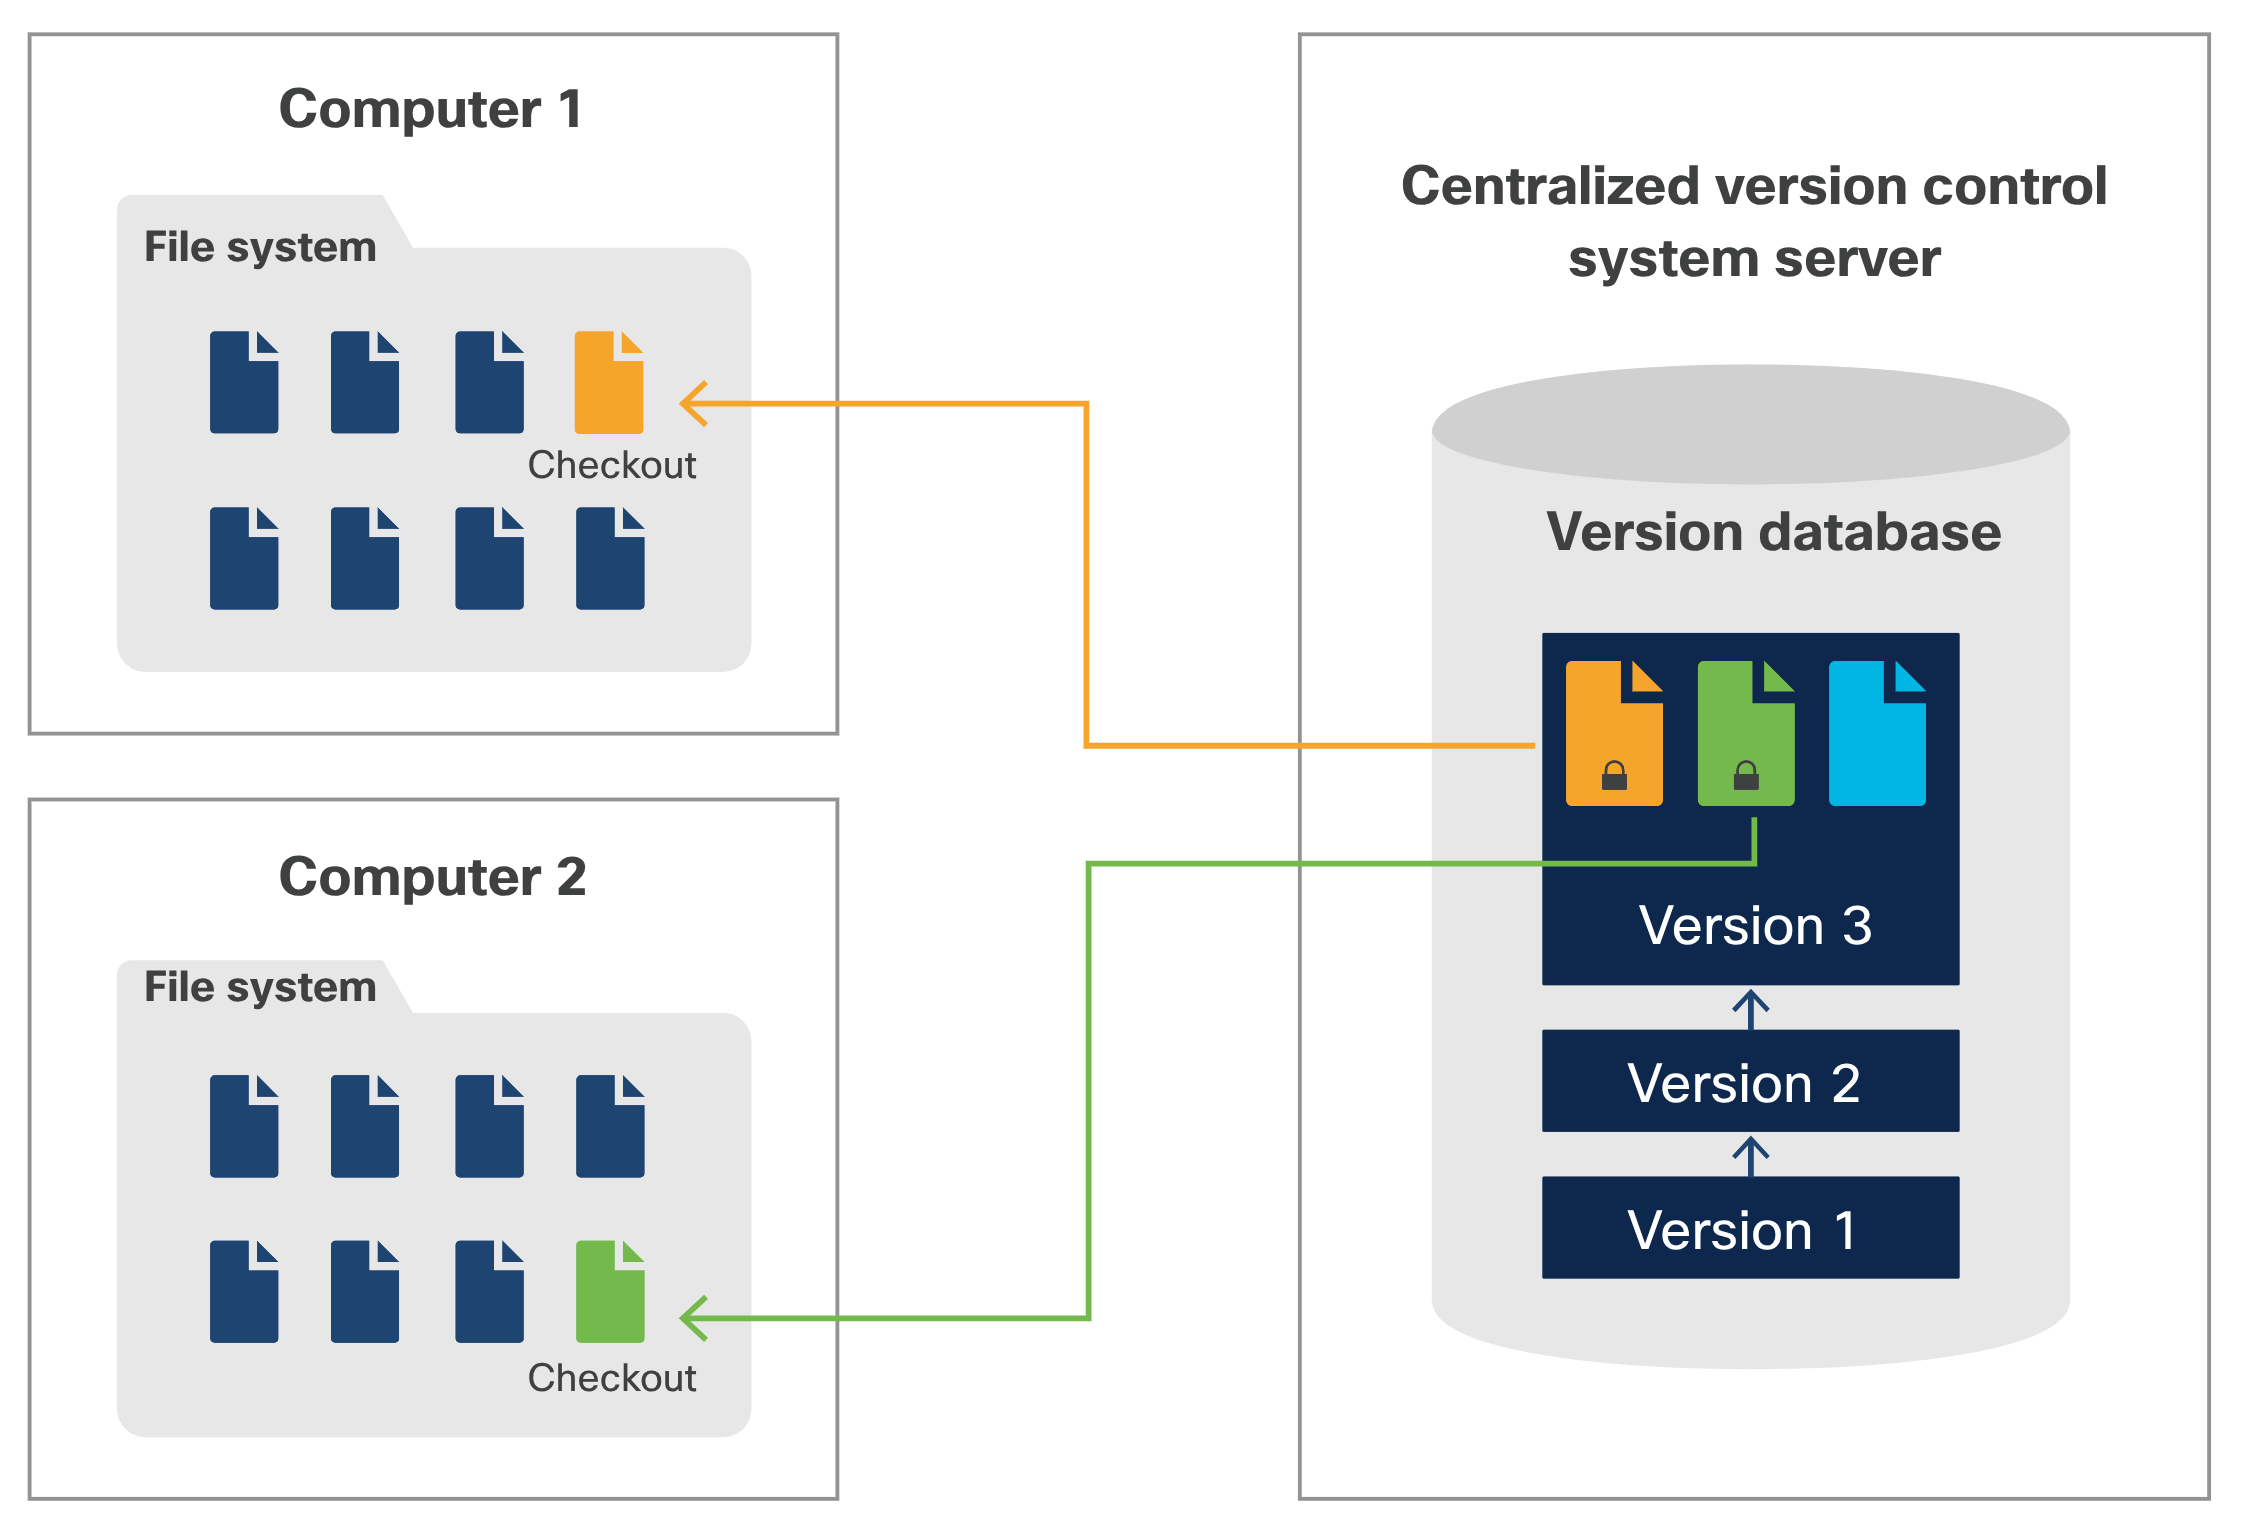
A Centralized Version Control Systems (CVCS) uses a server-client model. The repository (also known as the repo), which is the only copy of the set of files and history, is stored in a centralized location, on a server. Whenever an individual wants to make a change to a file, they must first get a working copy of the file from the repository to their own system, the client.
In a centralized version control system, only one individual at a time can work on a particular file. In order to enforce that restriction, an individual must checkout the file, which locks the file and prevents it from being modified by anyone else. When the individual is done making changes, they must checkin the file, which applies the individual's changes to the master copy in the repo, tags a new version, and unlocks the file for others to make changes.
Distributed Version Control System
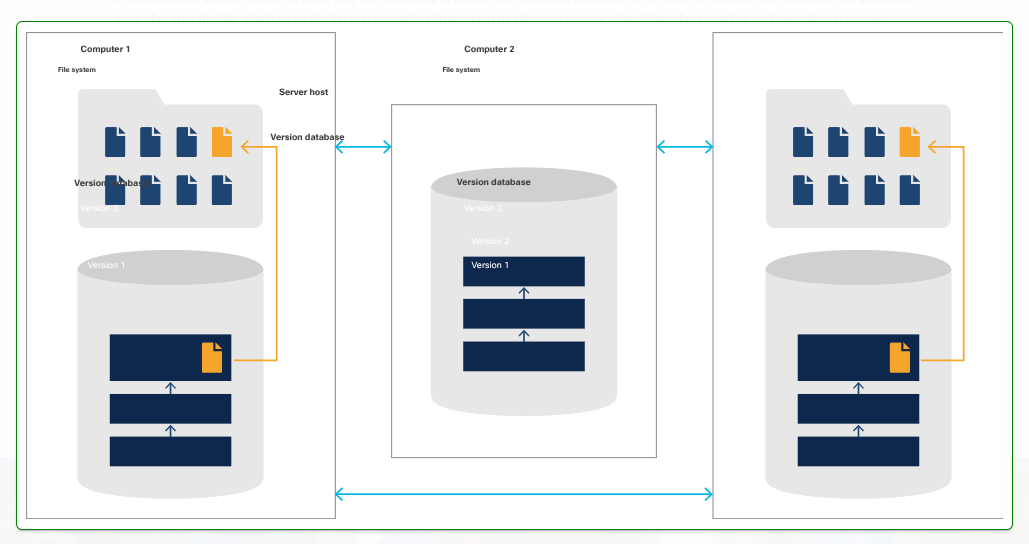
A Distributed Version Control System (DVCS) is a peer-to-peer model. The repository can be stored on a client system, but it is usually stored in a repository hosting service. When an individual wants to make a change to a file, they must first clone the full repository to their own system. This includes the set of files as well as all of the file history. The benefit of this model is that the full repository will be on multiple systems and can be used to restore the repository in the repository hosting service if an event such as data corruption occurs.
In a distributed version control system, every individual can work on any file, even at the same time, because the local file in the working copy is what is being modified. As a result, locking the file is not necessary. When the individual is done making the changes, they push the file to the main repository that is in the repository hosting service, and the version control system detects any conflicts between file changes.
Git
At the time of this writing, the most popular version control system in use is Git. Git is an open source implementation of a distributed version control system that is currently the latest trend in software development. Git:
Is easy to learn
Can handle all types of projects, including large enterprise projects
Has fast performance
Is built for collaborative projects
Is flexible
Has a small footprint
Has all the benefits of a distributed version control system
Is free
A Git client must be installed on a client machine. It is available for MacOS, Windows, and Linux/Unix. Though some Git clients come with a basic GUI, Git's focus is on the command line interface, about which we will go into detail later.
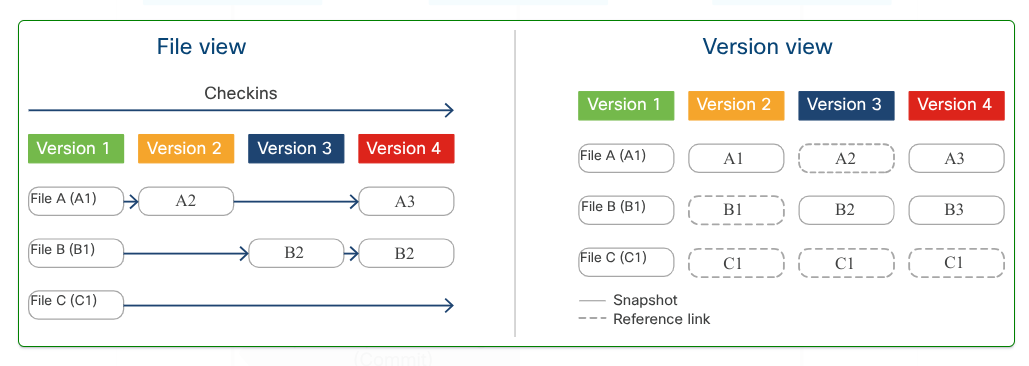
One key difference between Git and other version control systems is that Git stores data as snapshots instead of differences (the delta between the current file and the previous version). If the file does not change, git uses a reference link to the last snapshot in the system instead of taking a new and identical snapshot.
Git's 3s
Git is organized by threes -- three stages, and three states.
Git Three Stages
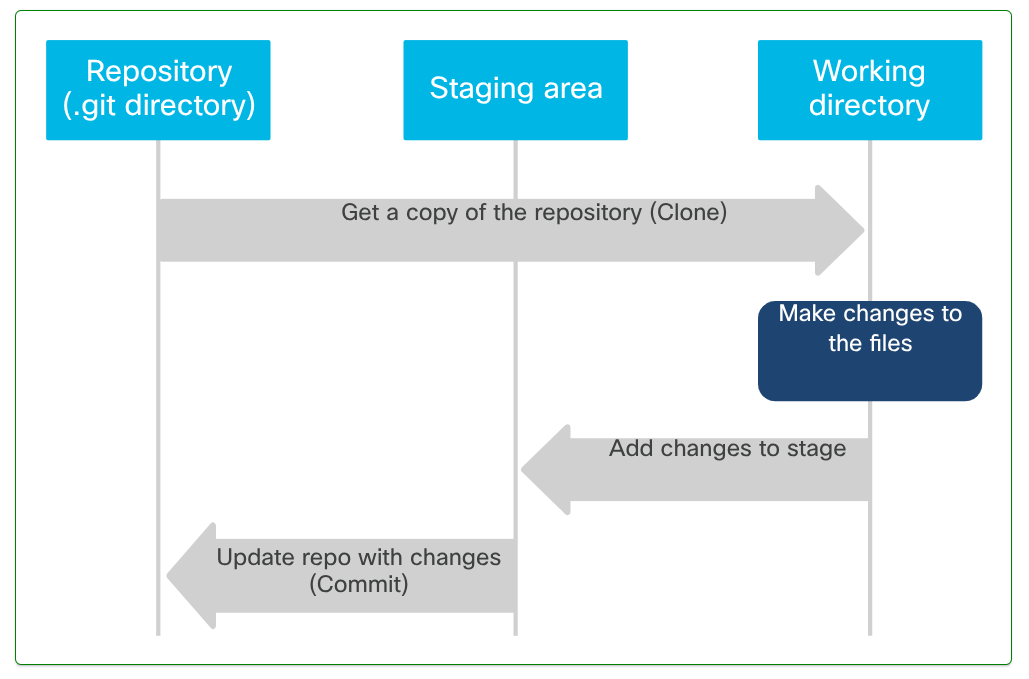
There are three stages in Git:
repository ( the .git directory)
working directory
staging area
REPOSITORY (.GIT DIRECTORY)
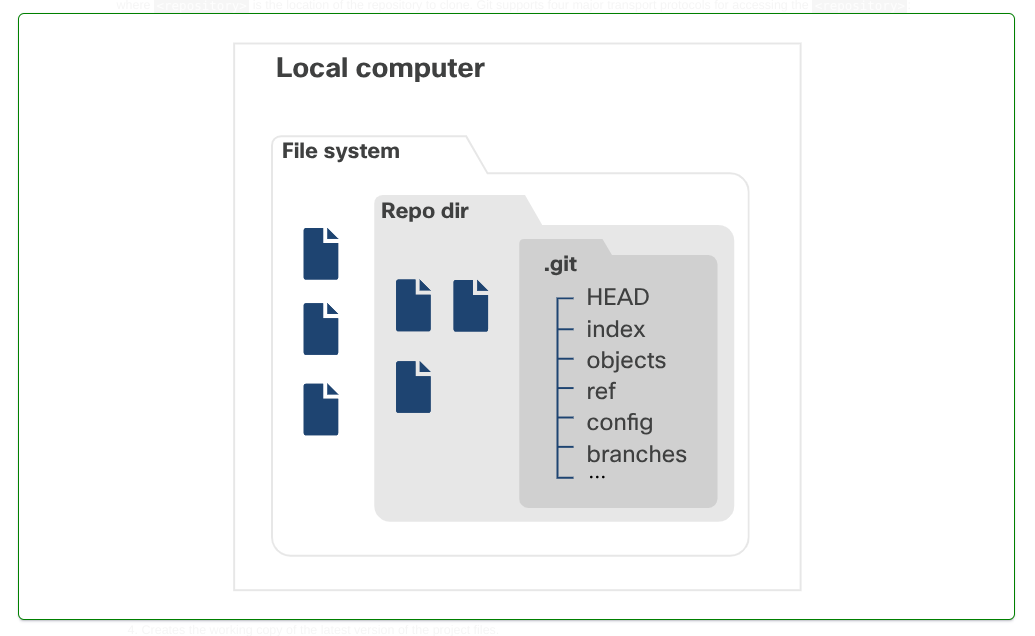
Because Git is a distributed version control system, each client has a full copy of the repository. When a project becomes a Git repository, a hidden .git directory is created, and it is essentially the repository. The .git directory holds metadata such as the files (compressed), commits, and logs (commit history).
WORKING DIRECTORY
The working directory is the folder that is visible in the filesystem. It is a copy of the files in the repository. These files can be modified, and the changes are only visible to the user of the client. If the client's filesystem gets corrupted, these changes will be lost, but the main repository remains intact.
STAGING AREA
The staging area stores the information about what the user wants added/updated/deleted in the repository. The user does not need to add all of their modified files to the stage/repo; they can select specific files. Although it is called an area, it is actually just an index file located in the .git directory.
Three States
Since there are three stages in Git, there are three matching states for a Git file:
committed - This is the version of the file has been saved in the repository (.git directory).
modified - The file has changed but has not been added to the staging area or committed to the repository.
staged - The modified file is ready to be committed to the repository.
Local vs. Remote Repositories
Git has two types of repositories, local and remote.
A local repository is stored on the filesystem of a client machine, which is the same one on which the git commands are being executed.
A remote repository is stored somewhere other than the client machine, usually a server or repository hosting service. Remote repositories are optional and are typically used when a project requires collaboration between a team with multiple users and client machines.
Remote repositories can be viewed as the "centralized" repository for Git, but that does not make it a CVCS. A remote repository with Git continues to be a DVCS because the remote repository will contain the full repository, which includes the code and the file history. When a client machine clones the repository, it gets the full repository without needing to lock it, as in a CVCS.
After the local repository is cloned from the remote repository or the remote repository is created from the local repository, the two repositories are independent of each other until the content changes are applied to the other branch through a manual Git command execution.
What is Branching?
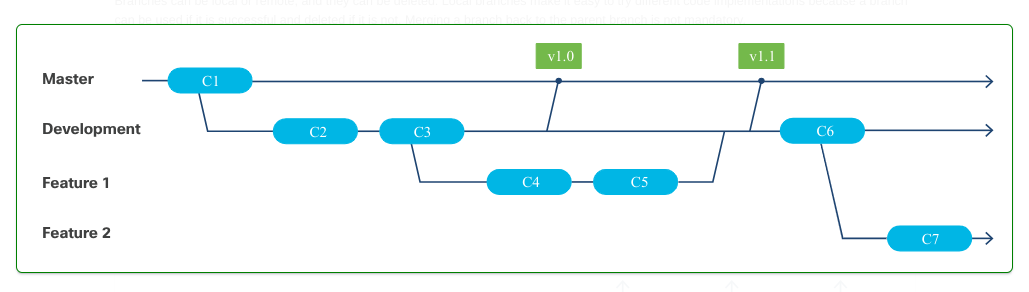
Branching enables users to work on code independently without affecting the main code in the repository. When a repository is created, the code is automatically put on a branch called Master. Users can have multiple branches and those are independent of each other. Branching enables users to:
Work on a feature independently while still benefitting from a distributed version control system
Work on multiple features concurrently
Experiment with code ideas
Keep production, development, and feature code separately
Keep the main line of code stable
Branches can be local or remote, and they can be deleted. Local branches make it easy to try different code implementations because a branch can be used if it is successful and deleted if it is not. Merging a branch back to the parent branch is not mandatory.
Unlike other version control systems, Git's branch creation is lightweight, and switching between branches is almost instantaneous. Although branches are often visually drawn as separate paths, Git branches are essentially just pointers to the appropriate commit.
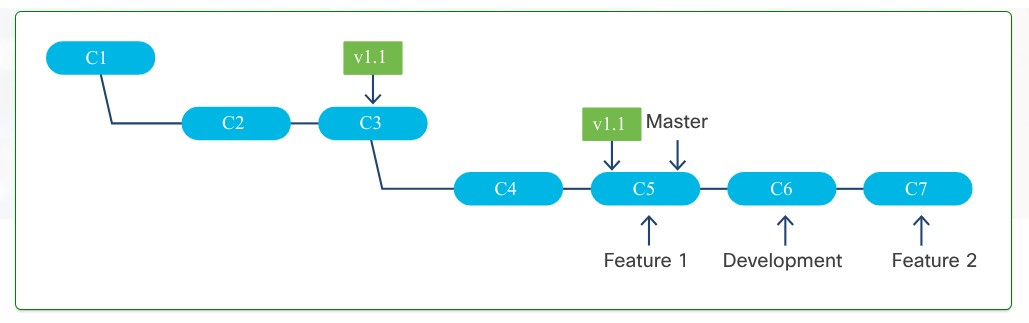
Branches are like a fork in the road, where it starts with the code and history at the point of diversion, then builds its own path with new commits independently. As a result, branches have their own history, staging area, and working directory. When a user goes from one branch to another, the code in their working directory and the files in the staging area change accordingly, but the repository (.git) directories remain unchanged.
Wherever possible, you should try to use branches rather than updating the code directly to the master branch in order to prevent accidental updates that break the code.
GitHub and Other Providers
Dealing with projects using Git is often associated with GitHub, but Git and GitHub are not the same. Git is an implementation of distributed version control and provides a command line interface. GitHub is a service, provided by Microsoft, that implements a repository hosting service with Git.
In addition to providing the distributed version control and source code management functionality of Git, GitHub also provides additional features such as:
code review
documentation
project management
bug tracking
feature requests
GitHub has evolved to support many forms of collaborative coding, including:
private repos visible only to designated teams
"social coding" projects that are public, but whose contributors may be anonymous
broad-based open source efforts with many contributors, sometimes numbering in the thousands
To enable project owners to manage in such widely-disparate scenarios, GitHub introduced the concept of the "pull request". A pull request is a way of formalizing a request by a contributor to review changes such as new code, edits to existing code, etc., in the contributor's branch for inclusion in the project's main or other curated branches. The pull request idiom is now universally-implemented in Git hosting services.
GitHub is not the only repository hosting service using Git, others include Gitlab and Bitbucket.
Git Commands
Setting up Git
After installing Git to the client machine, you must configure it. Git provides a git config command to get and set Git's global settings, or a repository's options.
To configure Git, use the --global option to set the initial global settings.
Command: git config --global key value
Using the --global option will write to the global ~/.gitconfig file.
For each user to be accountable for their code changes, each Git installation must set the user's name and email. To do so, use the following commands:
$ git config --global user.name "<user's name>"
$ git config --global user.email "<user's email>"
where <user's name> and <user's email> are the user's name and email address, respectively.
Create a New Git Repository
Any project (folder) in a client's local filesystem can become a Git repository. Git provides a git init command to create an empty Git repository, or make an existing folder a Git repository. When a new or existing project becomes a Git repository, a hidden .git directory is created in that project folder. Remember that the .git directory is the repository that holds the metadata such as the compressed files, the commit history, and the staging area. In addition to creating the .git directory, Git also creates the master branch.
Command: git init
To make a new or existing project a Git repository, use the following command:
$ git init <project directory>
where the <project directory> is the absolute or relative path to the new or existing project. For a new Git repository, the directory in the provided path will be created first, followed by the creation of the .git directory.
Creating a Git repository doesn't automatically track the files in the project. Files need to be explicitly added to the newly created repository in order to be tracked. Details on how to add files to a repository will be covered later.
Get an Existing Git Repository
With Git, it is easy to get a copy of and contribute to existing repositories. Git provides a git clone command that clones an existing repository to the local filesystem. Because Git is a DVCS, it clones the full repository, which includes the file history and remote-tracking branches.
Command : git clone <repository> [target directory]
where <repository> is the location of the repository to clone. Git supports four major transport protocols for accessing the <repository>: Local, Secure Shell (SSH), Git, and HTTP. The [target directory] is optional and is the absolute or relative path of where to store the cloned files. If you don't provide the project directory, git copies the repository to the location where you executed the command.
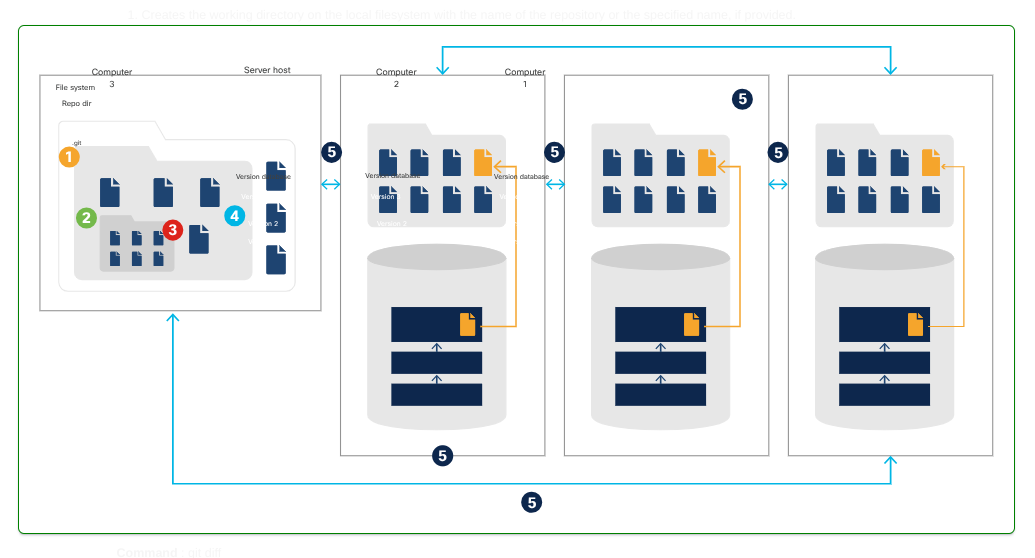
When you execute the git clone command, Git:
Creates the working directory on the local filesystem with the name of the repository or the specified name, if provided.
Creates a .git directory inside the newly created folder.
Copies the metadata of the repository to the newly created .git directory.
Creates the working copy of the latest version of the project files.
Duplicates the branch structure of the cloned, remote repository and enables tracking of changes made to each branch, locally and remotely — this includes creating and checking out a local active branch, "forked" from the cloned repository's current active branch.
Please see the official git clone documentation for more details and command line options.
View the Modified Files in the Working Directory
What has been changed in the working directory? What files were added in the staging area? Git provides a git status command to get a list of files that have differences between the working directory and the parent branch. This includes newly added untracked files and deleted files. It also provides a list of files that are in the staging area. Note that the difference is calculated based on the last commit that the local clone copied from the parent branch in the Git repository, not necessarily the latest version in the remote repository. If changes have been made since the repository was cloned, Git won't take those changes into account.
Command : git status
In addition to providing list of files, the output of the git status command provides additional information such as:
Current branch of the working directory
Number of commits the working directory is behind the latest version of the parent branch
Instructions on how to update the local repository and how to stage/unstage files
Please see the official git status documentation for more details and command line options.
Compare Changes Between Files
Want to know what was changed in a file, or the difference between two files? Git provides a git diff command that is essentially a generic file comparison tool.
Command : git diff
Because this command is a generic file difference tool, it includes many options for file comparison. When using this command, the file does not need to be a Git tracked file.
For example, you can:
1. Show changes between the version of the file in the working directory and the last commit that the local clone copied from the parent branch in the Git repository:
$ git diff <file path>
2. Show changes between the version of the file in the working directory and a particular commit from the file history:
$ git diff <commit id> <file path>
- Show changes between a file’s two commits from the file history.
<file path>is the absolute or relative path of the file to compare and<commit id>is the id of the version of the file to compare.
$ git diff <commit id 1> <commit id 2> <file path>
- Show the changes between two files in the working directory or on disk.
$ git diff <file path 1> <file path 2>
Please see the official git diff documentation for more details and command line options.
Adding and Removing Files
Adding Files to the Staging Area
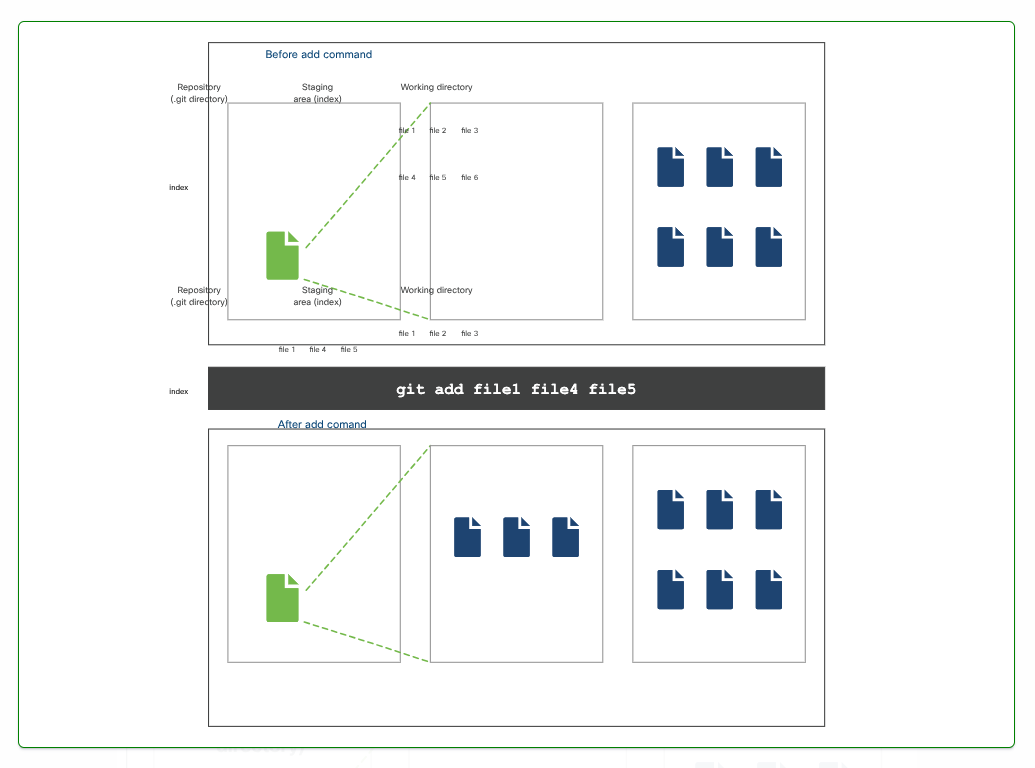
After changes have been made to a file in the working directory, it must first go to the staging area before it can be updated in the Git repository. Git provides a git add command to add file(s) to the staging area. These files being added to staging can include newly untracked files, existing tracked files that have been changed, or even tracked files that need to be deleted from the repository. Modified files don't need to be added to the working directory unless the changes need to be added to the repository.
Command : git add
This command can be used more than once before the Git repository is updated (using commit). Also, the same file can be added to the stage multiple times before a commit. Only the files that are specified in the git add command are added to the staging area.
To add a single file to the staging area:
$ git add <file path>
To add multiple files to the staging area where the <file path> is the absolute or relative path of the file to be added to the staging area and can accept wildcards.
$ git add <file path 1> ... <file path n>
To add all the changed files to the staging area:
$ git add .
Remember that Git has three stages, so adding files to the staging area is just the first step of the two-step process to update the Git repository.
Please see the official git add documentation for more details and command line options.
Removing Files from the Git Repository
There are two ways to remove files from the Git repository.
OPTION 1
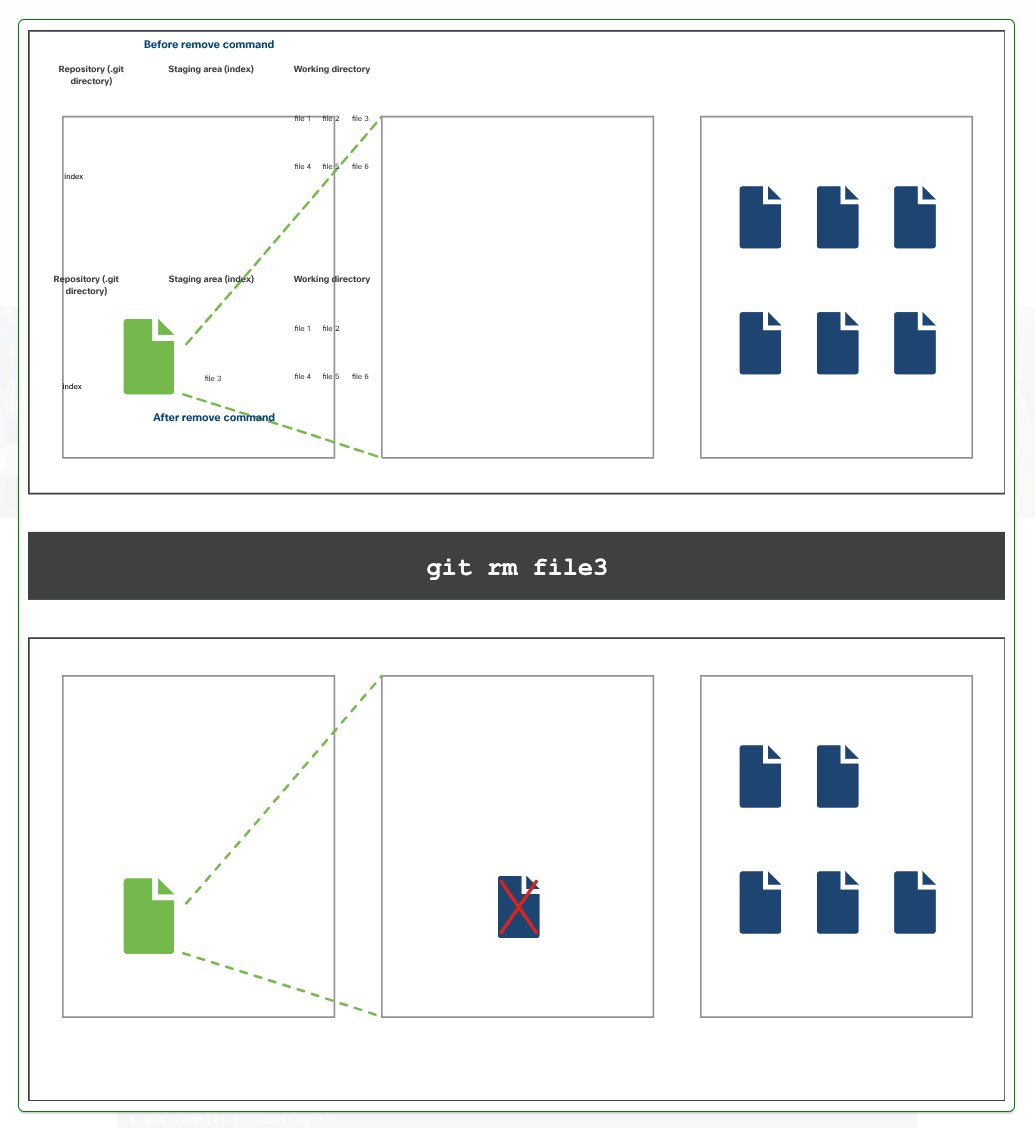
Git provides a git rm command to remove files from the Git repository. This command will add the removal of the specified file(s) to the staging area. It does not perform the second step of updating the Git repository itself.
Command : git rm
To remove the specified file(s) from the working directory and add this change to the staging area, use the following command:
$ git rm <file path 1> ... <file path n>
where <file path> is the absolute or relative path of the file to be deleted from the Git repository.
To add the specified file(s) to be removed to the staging area without removing the file(s) itself from the working directory, use the following command:
$ git rm --cached <file path 1> ... <file path n>
This command will not work if the file is already in the staging area with changes.
Please see the official git rm documentation for more details and command line options.
OPTION 2
This option is a two step process. First, use the regular filesystem command to remove the file(s). Then, add the file to stage using the Git command git add that was discussed earlier.
$ rm <file path 1> ... <file path n>
$ git add <file path 1> ... <file path n>
This two step process is equivalent to using the git rm <file path 1> ... <file path n> command. Using this option does not allow the file to be preserved in the working directory.
Updating Repositories
Updating the Local Repository with the Changes in the Staging Area
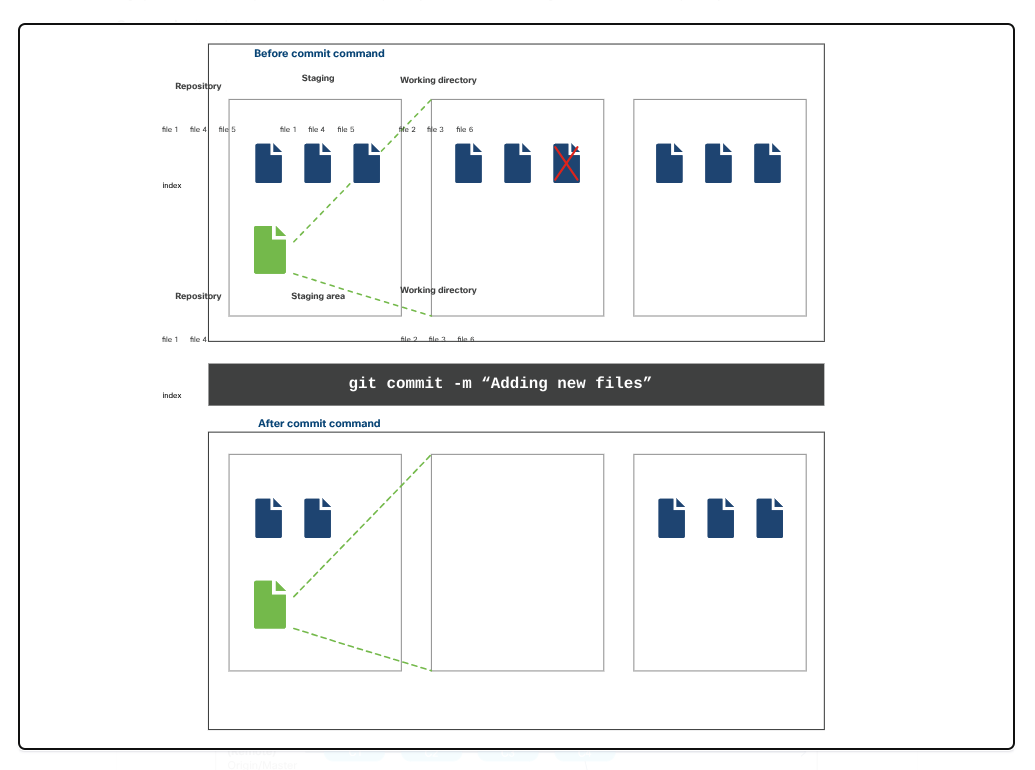
Remember that in Git, changes to a file go through three stages: working directory, staging area, and repository. Getting the content changes from the working directory to the staging area can be accomplished with the git add command, but how do the updates get to the repository? Git provides a git commit command to update the local repository with the changes that have been added in the staging area.
Command : git commit
This command combines all of the content changes in the staging area into a single commit and updates the local Git repository. This new commit becomes the latest change in the Git repository. If there is a remote Git repository, it does not get modified with this command.
To commit the changes from the staging area, use the following command:
$ git commit
It is good software development practice to add a note to the commit to explain the reason for the changes. To commit the changes from the staging area with a message, use the following command:
$ git commit -m "<message>"
If the git commit command is executed without any content in the staging area, Git will return a message, and nothing will happen to the Git repository. This command only updates the Git repository with the content in the staging area. It will not take any changes from the working directory.
Please see the official git commit documentation for more details and command line options.
Updating the Remote Repository
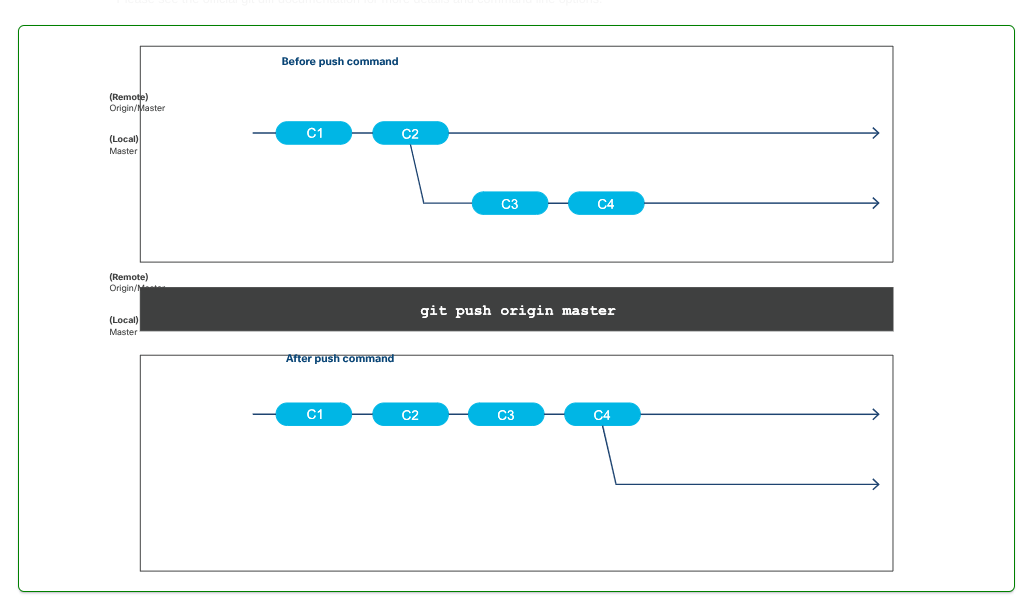
In order to share the content changes from the local Git repository with others, the remote Git repository must be manually updated. Git provides a git push command to update the remote Git repository with the content changes from the local Git repository.
Command : git push
This command will not execute successfully if there is a conflict with adding the changes from the local Git repository to the remote Git repository. Conflicts occur when two people edit the same part of the same file. For example, if you clone the repository, and someone else pushes changes before you, your push may create a conflict. The conflicts must be resolved first before the git push will be successful.
To update the contents from the local repository to a particular branch in the remote repository, use the following command:
$ git push origin <branch name>
To update the contents from the local repository to the master branch of the remote repository, use the following command:
$ git push origin master
Please see the official git diff documentation for more details and command line options.
Updating Your Local Copy of the Repository
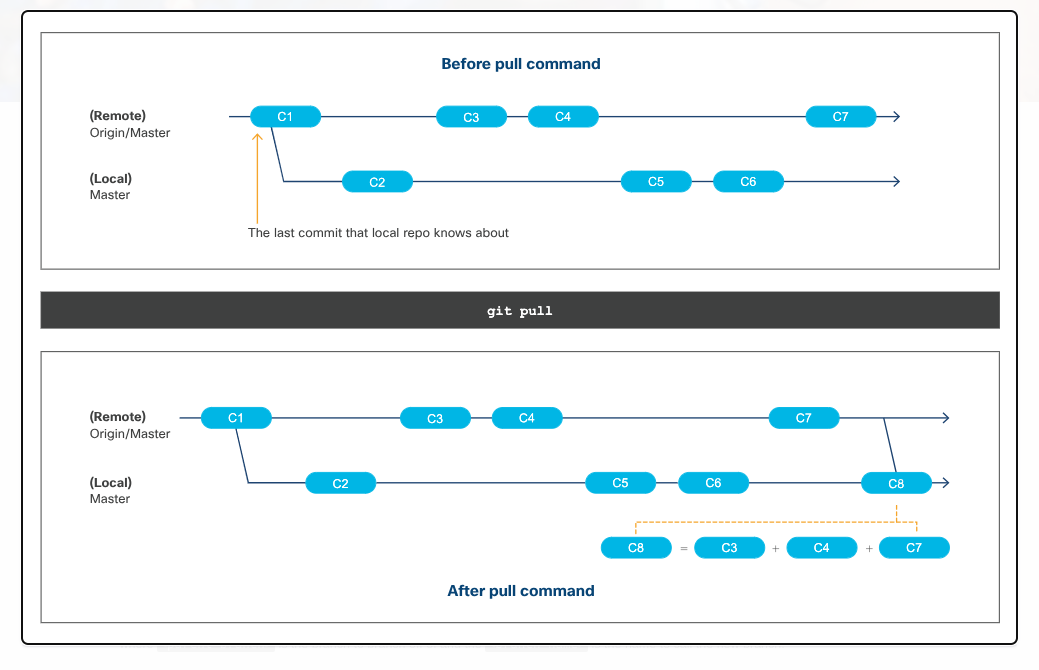
Local copies of the Git repository do not automatically get updated when another contributor makes an update to the remote Git repository. Updating the local copy of the repository is a manual step. Git provides a git pull command to get updates from a branch or repository. This command can also be used to integrate the local copy with a non-parent branch.
Command : git pull
To go into more details about the git pull command, when executing the command, the following steps happen:
The local repository (.git directory) is updated with the latest commit, file history, and so on from the remote Git repository. (This is equivalent to the Git command git fetch.)
The working directory and branch is updated with the latest content from step 1. (This is equivalent to the Git command git merge.)
A single commit is created on the local branch with the changes from step 1. If there is a merge conflict, it will need to be resolved.
The working directory is updated with the latest content.
To update the local copy of the Git repository from the parent branch, use the following command:
$ git pull
Or
$ git pull origin
To update the local copy of the Git repository from a specific branch, use the following command:
$ git pull origin <branch>
Please see the official git pull documentation for more details and command line options.
Branching Features
Creating and Deleting a Branch
Branches are a very useful feature of Git. As discussed earlier, there are many benefits of using branches, but one major benefit is that it allows features and code changes to be made independent of the main code (the master branch).
There are two options for creating a branch.
OPTION 1
Git provides a git branch command to list, create, or delete a branch.
Command : git branch
To create a branch, use the following command:
$ git branch <parent branch> <branch name>
where <parent branch> is the branch to branch off of and the <branch name> is the name to call the new branch.
When using this command to create a branch, Git will create the branch, but it will not automatically switch the working directory to this branch. You must use the git switch <branch name> command to switch the working directory to the new branch.
OPTION 2
Git provides a git checkout command to switch branches by updating the working directory with the contents of the branch.
Command : git checkout
To create a branch and switch the working directory to that branch, use the following command:
$ git checkout -b <parent branch> <branch name>
where <parent branch> is the branch to branch off of and the <branch name> is the name to call the new branch.
Deleting a Branch
To delete a branch, use the following command:
$ git branch -d <branch name>
Please see the official git branch and git checkout documentation for more details and command line options.
GET A LIST OF ALL BRANCHES
To get a list of all the local branches, use the following command:
$ git branch
Or
$ git branch --list
Merging Branches
Branches diverge from one another when they are modified after they are created. To get the changes from one branch (source) into another (target), you must merge the source branch into the target branch. When Git merges the branch, it takes the changes/commits from the source branch and applies it to the target branch. During a merge, only the target branch is modified. The source branch is untouched and remains the same.
For example:
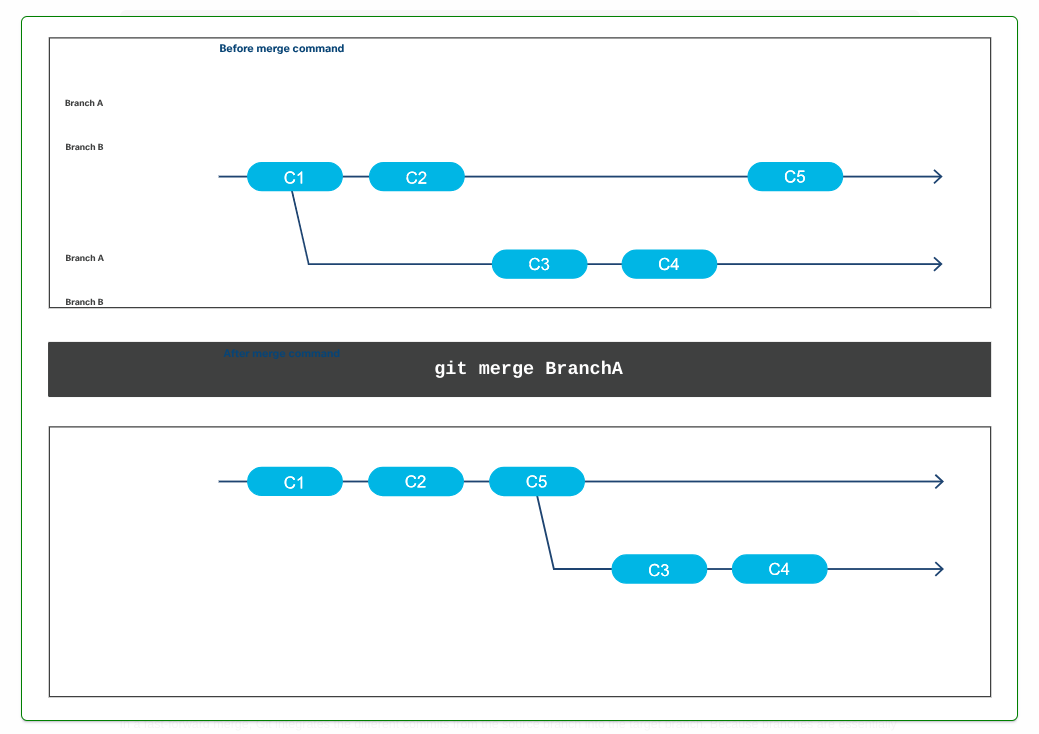
At commit#1, Branch B branched off of Branch A.
After the branches diverge, someone adds commit#2 to Branch A. Branch B does not get these changes.
Someone adds commit#3 and commit#4 to Branch B. Branch A does not get these changes.
Someone adds commit#5 to Branch A. Branch B does not get these changes.
Now, Branch A and Branch B have diverged by two commits each.
Let's say that Branch B wants the changes from Branch A since it diverged (commit#2 and commit#5). So, Branch A is the source branch and Branch B is the target branch. In this example, let's state that the commits were changes in different files. As a result, commit#2 and commit#5 are applied to Branch B and Branch A remains the same. This is called a fast-forward merge.
FAST-FORWARD MERGE
A fast-forward merge is when the Git algorithm is able to apply the changes/commits from the source branch(es) to the target branch automatically and without conflicts. This is usually possible when different files are changed in the branches being merged. It is still possible when the same file is changed, but typically when different lines of the file have been changed. A fast-forward merge is the best case scenario when performing a merge.
In a fast-forward merge, Git integrates the different commits from the source branch into the target branch. Because branches are essentially just pointers to commits in the backend, a fast-forward merge simply moves the pointer that represents the HEAD of the target branch, rather than adding a new commit.
Note that in order to do a fast-forward merge, Git has to be able to merge all of the existing commits without encountering any conflicts.
MERGE CONFLICTS
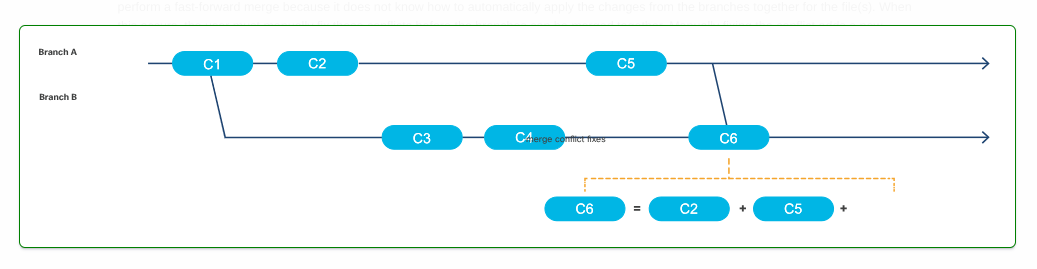
Modifying the same file on different branches to be merged increases the chances of a merge conflict. A merge conflict is when Git is not able to perform a fast-forward merge because it does not know how to automatically apply the changes from the branches together for the file(s). When this occurs, the user must manually fix these conflicts before the branches can be merged together. Manually fixing the conflict adds a new commit to the target branch containing the commits from the source branch, as well as the fixed merge conflict(s).
PERFORMING THE MERGE
Git provides a git merge command to join two or more branches together.
Command : git merge
To merge a branch into the client's current branch/repository, use the following command:
$ git merge <branch name>
where <branch name> is the source branch that is being merged into the current branch
When using the git merge command, the target branch must be the current branch/repository, so to merge a branch into a branch that is not the client's current branch/repository, use the following commands:
$ git checkout <target branch name>$ git merge <source branch name>
where <target branch name> is the target branch and the <source branch name> is the source branch.
To merge more than one branch into the client's current branch/repository, use the following command:
$ git merge <branch name 1>...<branch name n>
This is called an octopus merge.
Please see the official git merge documentation for more details and command line options.
.diff Files
What is a .diff file?
Developers use a .diff file to show how two different versions of a file have changed. By using specific symbols, this file can be read by other systems to interpret how files can be updated. The difference is used to implement the changes by comparing and merging the two versions. Some projects require changes to be submitted through a .diff file as a patch. Because it's all in one file, it's referred to as a unified diff .
The symbols and meanings in a unified diff file are shown below:
+ : Indicates that the line has been added.
- : Indicates that the line has been removed.
/dev/null : Shows that a file has been added or removed.
or "blank": Gives context lines around changed lines.
@@ : A visual indicator that the next block of information is starting. Within the changes for one file, there may be multiple.
index : Displays the commits compared.
Example diff for a file named check-network.yml :
diff --git a/check-network.yml b/check-network.yml
index 09b4f0c..b1978ca 100644
--- a/check-network.yml
+++ b/check-network.yml
@@ -4,7 +4,7 @@
   roles:
     - ansible-pyats
   vars:
-    snapshot_file: "{{ inventory_hostname }}_bgp.json"
+    snapshot_file: "{{ inventory_hostname }}_routes.json"
   tasks:
   - set_fact:
       snapshot_data: "{{ lookup('file', snapshot_file) | from_json }}"
@@ -13,7 +13,7 @@
#      var: snapshot_data
#
   - pyats_parse_command:
-      command: show ip route bgp
+      command: show ip route
       compare: "{{ snapshot_data }}"
     register: command_output
The signal can be a "+" or a "-" depending on the order of the hashes.
In this format, there are three lines shown above and below the exact changed line for context, but you can spot the differences by comparing the - line with the + line. One of the changes in this patch is to change the snapshot file name, replacing ...bgp.json with ...routes.json .
-    snapshot_file: "{{ inventory_hostname }}_bgp.json"
+    snapshot_file: "{{ inventory_hostname }}_routes.json"
You can always look at the difference between two files from a GitHub Pull Request as a unified diff by adding .diff to the GitHub URL.